Google Tag Gateway: What It Is and How to Set It Up in 2026
Reading time: ~11 minutes
If you're running Google Ads or GA4 in 2026, there's a good chance you're losing conversion data you don't even know about. Ad blockers, browser privacy features, and Safari's aggressive cookie policies are quietly deleting your tracking signals before they reach Google.
Google Tag Gateway is a free tool that fixes a big chunk of this. It works quietly in the background, no code changes needed, and according to Google's own data, advertisers who set it up see a median 11% improvement in measurement signals. That's 11% more conversions attributed, 11% better data feeding your bidding, 11% clearer picture of what's actually working.
This guide walks you through the whole thing — what it is, why it matters, when it's worth setting up, and how to actually do it using Cloudflare (the easiest path). Plain English. No developer needed for the standard setup.
Here's what we'll cover:
- What Google Tag Gateway actually is (in plain English)
- How it works behind the scenes
- Whether it's right for your business
- Step-by-step setup using Cloudflare
- How to verify it's working
- Common mistakes to avoid
Let's get into it.
What is Google Tag Gateway, in plain English?
To understand Google Tag Gateway, you need to understand a problem it solves.
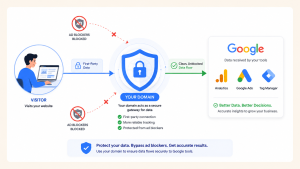
Right now, when a visitor lands on your website, your tracking scripts (GTM, GA4, Google Ads tags) get loaded from a Google-owned domain — usually googletagmanager.com or google-analytics.com. This has been the standard for years.
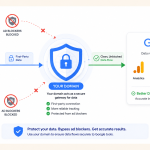
The problem: browsers and ad blockers can easily identify requests going to those Google domains and block them. Safari treats them as third-party. Firefox restricts them. Ad blocker extensions block them by default. And that means every time one of those requests gets blocked, you lose a conversion signal.
Google Tag Gateway (GTG) fixes this by serving your Google tags from your own domain instead of Google's.
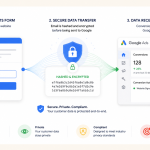
Instead of the browser requesting a script from googletagmanager.com/gtm.js, it now requests it from yourbusiness.com/measurement-path/gtm.js. Same script. Same functionality. But from the browser's perspective, it looks like a first-party request — which means ad blockers and privacy features don't touch it.
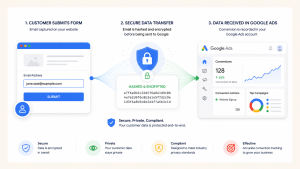
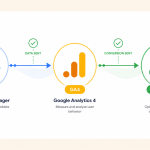
Behind the scenes, Google Tag Gateway routes the request through a CDN (typically Cloudflare) that forwards it to Google's servers and returns the response. From your visitor's browser, nothing looks unusual. From Google's perspective, it still gets the data. But the middle-man CDN makes it all look like first-party traffic to the browser.
Why this matters in 2026
You might be thinking: "How much data am I really losing?" Here's the honest answer.
- Ad blockers. Studies estimate around 30% of internet users have some form of ad blocker installed. Most of them block Google Analytics and tracking scripts by default.
- Safari. ITP (Intelligent Tracking Prevention) restricts cross-site cookies aggressively. Your tracking gets cut short after 1–7 days.
- Firefox. Blocks third-party cookies entirely by default.
- Browser fingerprinting protections. Growing across all major browsers.
Combined, this can mean 25–40% of your website visitors aren't being properly tracked. You're paying for ad clicks and getting no conversion signal from a chunk of them. That's real money.
Google Tag Gateway won't solve 100% of this — nothing will — but it recovers a meaningful portion, and Google's median measurement of 11% improvement is a good realistic expectation.
Should you set this up? (An honest answer)
Google Tag Gateway is genuinely useful, but it's not a good fit for every business. Here's the honest breakdown.
You should set it up if:
- You spend more than a few hundred dollars a month on Google Ads (the 11% accuracy boost pays for itself)
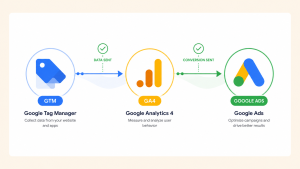
- You already have GTM installed and working (this is a prerequisite)
- You're comfortable creating a free Cloudflare account and pointing your DNS through it (30 minutes of setup)
- You care about conversion accuracy — especially if you use Smart Bidding, which relies on quality data
You can skip it (for now) if:
- You don't have GTM installed yet — start there first with our Google Ads Conversion Tracking with GTM & GA4 guide
- Your ad spend is very small (under $200/month) — the accuracy boost is real but marginal at that level
- You already have server-side tagging (SGTM) properly configured — SGTM covers most of what GTG does, and better
- You're not willing to route DNS through Cloudflare (some businesses have technical or organisational reasons not to)
One important note: Google Tag Gateway and server-side tagging solve overlapping problems. If you already have SGTM working properly, GTG is nice-to-have, not essential. If you don't, GTG is the cheaper, simpler option and gets you 70–80% of the benefit.
What you'll need before you start
Get these sorted first:
- An active Google Tag Manager container installed on your website
- Publish permissions in your GTM account
- A Cloudflare account — free plan is fine. You'll create this in the setup if you don't have one already.
- Access to your domain's DNS settings (usually your domain registrar — GoDaddy, Namecheap, Cloudflare, etc.)
- About 45–60 minutes for the initial setup, plus 24–48 hours for DNS propagation
One thing worth checking: if your website already uses Cloudflare as its CDN, you're most of the way there. You'll skip the DNS setup entirely.
Step 1: Set up Cloudflare (if you're not already using it)
Cloudflare is the recommended path for Google Tag Gateway because it's free, easy, and the integration is native. If you're already using Cloudflare as your DNS provider, skip to Step 2.
Create a Cloudflare account and add your site
- Go to cloudflare.com and sign up for a free account.
- Once signed in, click Add site.
- Enter your domain (e.g., yourbusiness.com) and click Continue.
- Choose the Free plan. It's genuinely enough for what we need.
- Cloudflare will scan your existing DNS records and show them to you. Review them for accuracy — if anything's missing, you can add it manually.
- Click Continue to see your assigned Cloudflare nameservers (usually two, like bob.ns.cloudflare.com and alice.ns.cloudflare.com).
Update your domain's nameservers
This is the part that requires access to your domain registrar (wherever you bought your domain — GoDaddy, Namecheap, Google Domains, etc.).
- Sign in to your domain registrar's dashboard.
- Find your domain and look for a Nameservers or DNS Management section.
- Change the nameservers to the ones Cloudflare gave you.
- Save changes.
DNS changes can take anywhere from a few minutes to 48 hours to propagate globally. Cloudflare will email you when your site is fully active on their network. Don't proceed to Step 2 until that email arrives.
Bonus: while you're here, Cloudflare also gives you free CDN, DDoS protection, and often faster load times. Setting it up is a legitimate upgrade for your site even beyond Google Tag Gateway.
Step 2: Get your Google tag ID ready
Google Tag Gateway needs to know which Google tag you're routing. This is the Google tag ID (sometimes called Container ID for GTM, or Measurement ID for GA4).
- Sign in to tagmanager.google.com.
- Open your container.
- Look at the top-right corner — you'll see your container ID starting with GTM-XXXXXXX.
- Copy this ID somewhere handy. You'll need it in a moment.
If you're using GA4 without GTM, your Measurement ID starts with G-XXXXXXX and can be found in GA4 under Admin → Data streams → Web stream.
Not comfortable touching DNS settings?
DNS and Cloudflare aren't scary once you've done them before — but the first time can feel risky. If you'd rather have someone handle the whole setup end-to-end, we do this for small businesses regularly.
Get help with your setup →
Step 3: Enable Google Tag Gateway
You can enable Google Tag Gateway from two places: inside Google Tag Manager itself, or directly from your Cloudflare dashboard. Both work — GTM is usually easier if you already spend time there.
Option A: Enable from Google Tag Manager (recommended)
- In GTM, click Admin at the top.
- Under the Container column, click Container Settings.
- Scroll down and find the Google Tag Gateway section.
- Click Enable Google Tag Gateway.
- GTM will guide you through connecting your Cloudflare account. Sign in when prompted and authorise the connection.
- Choose the domain you want to enable GTG for.
- Configure the measurement path — this is a URL path on your site that will handle the tag requests (e.g., /gtm-metrics/). Choose something that isn't already used by any page on your site.
- Click Save.
Option B: Enable from Cloudflare
- Sign in to dash.cloudflare.com.
- Select your domain.
- In the left menu, find Google Tag Gateway (usually under Tools or Rules).
- Toggle Turn on and configure Google tag gateway.
- Enter your Google tag ID (the GTM-XXXXXXX or G-XXXXXXX you copied earlier).
- Enter the measurement path you want to use (e.g., /gtm-metrics/).
- Click Save.
Important: if you already have a GTM script hardcoded on your website, the Cloudflare-configured Tag Gateway will override it. This is normal and expected. Your existing tags will now load from your domain instead of Google's.
Step 4: Verify it's actually working
Setting things up isn't enough — you need to confirm requests are actually going through your domain. Here's how to check.
Method 1: Browser DevTools
- Open your website in Chrome (or any browser).
- Press F12 to open Developer Tools.
- Click the Network tab.
- Reload the page.
- In the filter box, type gtm or your measurement path (e.g., gtm-metrics).
- Look at the domain in the results. If Google Tag Gateway is working, the requests should show your domain (e.g., yourbusiness.com/gtm-metrics/…), not googletagmanager.com.
Method 2: Google Tag Assistant
- Install the Tag Assistant Companion Chrome extension.
- Visit your website.
- Click the Tag Assistant icon.
- You should see your GTM container listed and firing correctly. Tag Assistant will indicate that it's loading via first-party mode.
Method 3: Compare data over time
The real proof is in your Google Ads and GA4 data. Give it 7–14 days after activation, then compare:
- Conversion volume before vs. after
- Sessions in GA4 before vs. after
- Ad blocker filtered traffic (some analytics tools show this)
You should see a modest but noticeable increase in tracked conversions and sessions. If you don't, something isn't wired up correctly — go back through the setup.
Common mistakes to avoid
Five things that trip people up during Google Tag Gateway setup.
1. Choosing a measurement path that already exists on your site
If you pick /metrics/ as your measurement path but you already have a page at yourbusiness.com/metrics/, they'll collide and things will break. Choose something unique — /gtm-abc123/ or /tag-data/ works fine. It doesn't matter what it's called; it just has to be unused.
2. Not waiting for DNS propagation
If you just changed your nameservers to point to Cloudflare, wait for the confirmation email before enabling Google Tag Gateway. Otherwise, requests won't route through Cloudflare, and GTG won't work. This can take up to 48 hours in rare cases.
3. Ignoring Consent Mode
Google Tag Gateway doesn't override user consent preferences. If your Consent Mode setup is broken or missing, GTG can't magically fix data quality for users who declined tracking. Set up Consent Mode V2 properly if you serve European traffic.
4. Assuming it replaces server-side tagging
It doesn't. GTG and SGTM are different tools that solve overlapping problems. If you have SGTM already, GTG is a nice supplement. If you're planning to move to SGTM later, don't skip GTG in the meantime — it's a low-effort improvement.
5. Forgetting to update firewall or WAF rules
If your site has strict WAF (Web Application Firewall) rules blocking non-existent paths, your measurement path might get blocked. If tracking suddenly stops working after enabling GTG, check your firewall/WAF logs for blocked requests to your measurement path.
What to do once it's running
Google Tag Gateway is a genuinely "set it and forget it" tool, but here are a few worthwhile follow-ups.
- Monitor for 30 days. Compare conversion volume before vs. after. If you see the promised 5–15% lift, everything is working.
- Set up Enhanced Conversions. If you haven't yet, GTG pairs beautifully with Enhanced Conversions for even more accuracy. Our Enhanced Conversions setup guide walks through it.
- Refine your Smart Bidding. Better data = better bidding. If you were on Manual CPC or Maximise Clicks, the extra conversion accuracy from GTG might be enough to move to Maximise Conversions or Target CPA.
- Consider server-side tagging later. Once you're comfortable with GTG, SGTM is the next level of measurement infrastructure. It gives you full control over what data goes to which platforms.
Final thoughts
Google Tag Gateway sounds technical, but for a Cloudflare-based setup, it's genuinely one of the highest-impact, lowest-effort upgrades you can make in 2026. An hour of setup work recovers a chunk of conversion data you've been quietly losing — and that data quality flows into every part of your Google Ads and GA4 reporting.
The 11% improvement isn't a marketing exaggeration; it's Google's own median measurement across advertisers who've enabled it. Some see more, some see less, but the direction is consistent.
If you're spending money on Google Ads and haven't set this up yet, it's worth doing this month. The tools are free. The setup is straightforward. And the payoff shows up in every campaign metric that matters.
Published by googlemarketing.io — helping small businesses get more out of Google Ads, Analytics, Tag Manager, and SEO.