
Reading time: ~14 minutes
Most "how to set up Google Ads" guides online give you the obvious steps and skip the parts that actually decide whether your campaign makes money or burns it.
This guide is different. It's written for small business owners who are about to spend real money — and who'd rather not learn the expensive lessons the hard way. We'll walk through every step of setting up your first Search campaign, but we'll also tell you what to ignore, what Google tries to auto-add that you should turn off, and how to set a budget that actually has a chance of working.
By the end, you'll have a Search campaign that's structured properly, bidding sensibly, and ready to start gathering data — without falling for the common traps that drain budgets in the first month.
Here's what we'll cover:
Let's get into it.
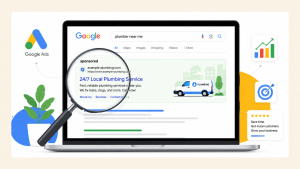
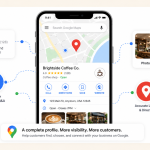
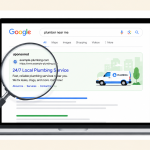
A Search campaign shows text ads at the top of Google's search results when people type queries related to your business. Someone types "emergency plumber near me" — your ad appears. They click. You pay. They (hopefully) become a customer.
Why this is the right campaign type to start with as a small business:
Skip Performance Max, Smart campaigns, and Display Network expansion for now. You can experiment with those later, once you have data flowing.
Don't even open Google Ads until you've handled these three things. Skipping them is the single biggest reason new campaigns flop.
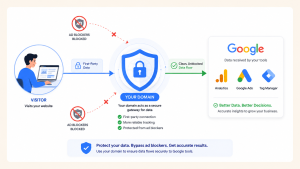
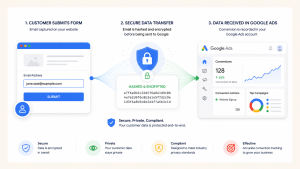
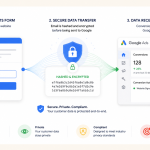
Running Google Ads without conversion tracking is like driving with the windshield blacked out. You'll see clicks. You won't see leads or sales — which means you won't know which keywords work, which ads work, or whether you're making money.
If you haven't set this up yet, do it now using our Google Ads Conversion Tracking with GTM & GA4 guide. It takes about 30 minutes and saves you hundreds of dollars in wasted spend.
Before you set a budget, answer these three questions:
This math sets your maximum cost-per-conversion. Without it, you have no idea whether your campaign is winning or losing.
The best ads in the world can't save a bad landing page. Before you spend a dollar on ads, make sure the page you'll be sending people to:
If your homepage is the only page you can send traffic to, that's fine for starting — but plan to build dedicated landing pages within the first month.
Here's where most beginners get tripped up. Google's onboarding flow tries hard to push you into a Smart campaign — its automated, simplified format that's great for Google's profits but rarely great for yours.
You now have an empty Google Ads account ready for you to build a proper campaign — not a Smart one.
Important: you'll need to add billing information before your ads can run, but you can do this after you've built the campaign. Don't let "add payment method" prompts pressure you to fill out billing before you're ready.
Google will recommend Maximise Conversions as the default. Here's the honest truth: this only works well after you have at least 15–30 conversions per month. For a brand-new campaign with zero conversion history, Maximise Conversions will spend your budget aggressively without knowing what's actually converting.
Our recommendation for new campaigns:
Switching too early to automated bidding is one of the most expensive beginner mistakes. The algorithm needs data to optimise — without it, it just spends.
Google enables both the Display Network and Search Partners by default. Uncheck both.
Pure Google Search only, for now.
The "Presence or interest" default is a budget killer for local businesses. Always change it.
Your daily budget is your campaign's lifeblood. Here's how to set it properly:
Important: Google can spend up to 2× your daily budget on high-traffic days, but it averages out over the month. So if you set $16/day, expect $20+ on some days and less on others — totalling around your $500 cap.
For most small businesses, the minimum viable daily budget for a Search campaign is $10–$15. Below this, you won't get enough clicks per day for the algorithm (or you) to learn anything meaningful.
Want this done right the first time?
A poorly set up Google Ads campaign can burn through a month's budget in a week. We've set up hundreds of campaigns for small businesses — we'd be happy to do yours properly so you start with the wind at your back.
Get your campaign set up →Ad groups are containers for related keywords and ads. The rule: each ad group should be tightly themed. If you're a plumber, don't put "emergency plumber Sydney" in the same ad group as "blocked drain Sydney." They need different ads to perform well.
You don't need Semrush or Ahrefs for your first campaign. Here are three free ways to find keywords:
Aim for 5–15 keywords per ad group. Quality over quantity. Vague keywords like "plumber" will drain your budget on the wrong searches.
Match types tell Google how strictly to match your keyword to user searches. For new campaigns, this is critical:
Google strongly pushes broad match in 2026. Their pitch is that AI now matches it intelligently. Maybe — but the data is mixed, and broad match without proper conversion data feeding it is a fast way to lose money. Stick with exact and phrase match until you have at least 30 conversions in your account.
Negative keywords prevent your ads from showing on certain searches. This is one of the most overlooked beginner tasks.
Universal negatives to add to every new account:
Industry-specific negatives matter too. If you're a paid law firm, add "legal aid" and "pro bono." If you sell high-end services, add "discount" and "wholesale." Spend 15 minutes thinking about all the searches you don't want to pay for.
Responsive Search Ads (RSAs) are now the only ad format in Google Ads. You provide up to 15 headlines and 4 descriptions, and Google's algorithm tests different combinations to find the highest performers.
Aim for 8–12 unique headlines per ad. Don't waste slots on near-duplicates. Mix these angles:
Avoid vague filler like "Best Service" or "Quality You Can Trust." These don't earn clicks.
Descriptions get less visual weight than headlines but still matter. Use them to:
Assets are the extra bits below your ad — sitelinks, callouts, phone numbers, and so on. They make your ad take up more space on the search results page, which boosts click-through rate. Always add these:
According to Google's official documentation on assets, ads with assets get more clicks because they take up more real estate and look more credible.
Before clicking "Publish," go through this final checklist:
When this all checks out, click Publish. Add your billing info if you haven't already. Your campaign is live.
Launching is just the start. Here's the rough timeline of what to do next.
Resist the urge to change things every day. Google needs at least a week of data to start showing trends. The only thing to monitor closely in the first week:
Five things that catch out small business owners more than anything else. Worth a final read before you launch.
The algorithm needs data to work. Without 15+ conversions a month, automated bidding is just an aggressive spender. Stick with manual until you have proof your tracking and keywords are right.
Google now auto-applies "recommendations" by default, things like adding broad match keywords, applying generic asset suggestions, and increasing budgets. Turn this off. Go to Settings → Account-level settings → Auto-apply recommendations → uncheck everything. Manage your own account.
Clicks are vanity. Conversions are sanity. If you're celebrating CTR but no one's filling out your form, you're optimising the wrong number. Always track all the way to leads/sales.
Tiny budgets generate too little data for anything to optimise. If you can't afford at least $300/month for a full Search campaign, focus on Google Business Profile and SEO first.
Things break. Your landing page can go down. A keyword can suddenly trigger irrelevant searches. Before you launch, know how to log in and pause the campaign in under 2 minutes. (Hint: bookmark ads.google.com.)
A well-set-up Search campaign is one of the most reliable ways for a small business to get customers. But "well-set-up" is doing a lot of work in that sentence. The difference between a Google Ads account that prints money and one that bleeds it usually isn't strategy — it's the fundamentals we just covered. The Display Network being turned off. Exact match keywords on a starter campaign. A real negative keyword list. Manual bidding until the data justifies otherwise.
Take the time to set it up properly. Resist Google's pressure to take the "easy" defaults. Watch your search terms report obsessively in the first two weeks. And once you have data flowing in, you can confidently lean into smart bidding, broader match types, and bigger budgets.
If you've followed this guide, you're already ahead of 80% of small business advertisers — most of whom never turn off the Display Network and never look at their search terms report. Welcome to the better-performing minority.
Setting up a Google Ads Search campaign properly takes about 3–4 hours when you know what you're doing. We've done hundreds of these — we'd be happy to set up yours so you start with the wind at your back, not against it.
Published by googlemarketing.io — helping small businesses get more out of Google Ads, Analytics, Tag Manager, and SEO.


Copyright 2026 Altic LLC All rights reserved.